paint your own cookies instructions
Paint-your-own cookies are a fun and interactive edible craft, perfect for all skill levels. Each kit includes baked cookies, icing, and sprinkles, letting you unleash your creativity. Ideal for holidays, parties, or family activities, these customizable treats offer a delicious way to express your artistic side. Great for kids and adults alike!
Materials and Tools Needed
Essential materials include baked cookies, royal icing, edible paints, stencils, and decorating tools like brushes, scrapers, and piping bags. These items ensure a smooth and creative process.
- Baked sugar cookies
- Royal icing in various colors
- Edible paints or food coloring
- Decorating tools (brushes, scrapers)
- Stencils for design guidance
Baked Cookies
Baked cookies are the foundation of paint-your-own creations. Use a classic sugar cookie dough, rolled to 1/4-inch thickness for even baking. Cut into shapes like circles, squares, or seasonal themes. Bake at 350°F until lightly golden, about 10-12 minutes. Allow cookies to cool completely on a wire rack before decorating. For best results, ensure cookies are dry and crumb-free. You can also purchase pre-baked cookies or use store-bought dough for convenience. Properly baked cookies provide a sturdy base for icing and paint, ensuring your artwork stays intact. Let creativity shine on these edible canvases!
- Classic sugar cookie dough
- Pre-baked or store-bought options
- Cooled and crumb-free surface
Edible Paints and Icing
Edible paints and icing are essential for customizing your cookies. Royal icing is a popular choice, available in various consistencies—thin for flooding and thick for detailing. To make edible paints, mix food-grade colors with a small amount of vanilla extract or vodka for a vibrant, paintable consistency. These paints can be applied using brushes or airbrushes for intricate designs. Pre-made icing kits are also available, offering convenience and ease. Always ensure ingredients are food-safe and suitable for consumption. Properly prepared icing and paint are key to achieving professional-looking results on your edible canvas.
- Royal icing in varying consistencies
- Edible paints made from food colors
- Pre-made icing kits for convenience
Decorating Tools
Essential tools for decorating paint-your-own cookies include stencils, brushes, and scrapers. Stencils help create precise designs, while small brushes allow for detailed painting with edible colors. A scraper or toothpick is useful for spreading or smoothing icing. Squeeze bottles with fine tips are ideal for outlining and flooding with royal icing. Optional tools like airbrushes or dotting tools can add intricate patterns. These tools empower creativity, making the decorating process enjoyable and rewarding for all skill levels.
- Stencils for design precision
- Small brushes for painting details
- Scrapers or toothpicks for smoothing
- Squeeze bottles for icing application
- Optional airbrushes or dotting tools

Preparation Steps
Bake and cool cookies, then prepare royal icing. Chill dough, roll to 1/4-inch thickness, and bake until firm. Royal icing needs proper consistency for outlining and flooding.
Baking the Cookies
Preheat your oven to 375°F (190°C). Roll out sugar cookie dough to 1/4-inch thickness and cut into desired shapes. Bake for 10-12 minutes until lightly golden. Allow cookies to cool on the baking sheet for 5 minutes, then transfer to a wire rack to cool completely. Ensure cookies are firm and fully cooled before decorating, as this prevents icing from melting or sliding off. Properly baked cookies provide a sturdy base for painting and icing, ensuring your designs hold well. This step is crucial for achieving professional-looking results in your paint-your-own cookie project.
Preparing Royal Icing
To prepare royal icing, combine 2 cups of sifted confectioners’ sugar with 2-3 tablespoons of meringue powder and 2-4 tablespoons of water. Mix until smooth and free of lumps. For paint-your-own cookies, aim for a 15-20 second icing consistency, ideal for outlining and flooding. Divide the icing into smaller portions for coloring with food-grade dyes. This icing is perfect for creating detailed designs and adhering decorations. Properly prepared royal icing ensures vibrant, long-lasting results. Store leftovers in an airtight container to maintain freshness and consistency for future use. This step is essential for achieving professional-quality decorations on your cookies.
Decorating Techniques
Explore creative decorating techniques like outlining, flooding, and stencil application. Use edible paints for detailed designs, ensuring vibrant and precise results. Perfect for both kids and adults!
Outlining and Flooding with Royal Icing
Outlining and flooding are essential techniques for creating professional-looking cookies. Start by using a piping bag with a fine tip to outline the cookie’s edges with 15-20 second icing. This consistency ensures smooth lines without spreading. Once the outline is dry, flood the interior with thinner icing, spreading evenly with a toothpick or knife. Allow the flooding layer to dry completely, typically 8 hours, for a polished finish; This method prevents colors from bleeding and creates a clean canvas for further decoration, like adding details or using edible paints for intricate designs. Perfect for both beginners and experienced decorators alike.
Using Stencils for Designs
Stencils are a fantastic way to achieve intricate and precise designs on your cookies. Place a stencil over the dried royal icing base and apply a thin layer of contrasting icing or edible paint using a scraper or knife. Gently swipe across the stencil to fill in the design, ensuring even coverage. Peel the stencil away after each swipe to avoid smudging. This method works beautifully for patterns like stripes, polka dots, or festive motifs. Stencils are especially helpful for beginners or when working with kids, as they simplify the decorating process. They also add a professional touch to your cookies, making them perfect for gifts or special occasions. This technique allows for endless creativity while maintaining a polished look.
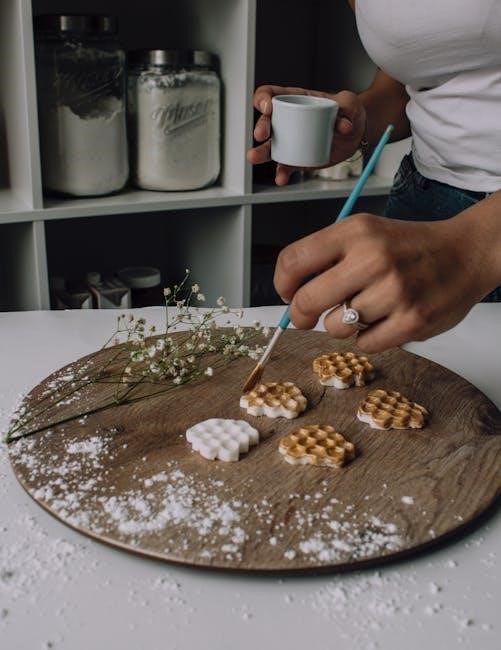
Applying Edible Paints
Edible paints add a vibrant and personalized touch to your cookies. Use high-quality food-grade paints or mix a few drops of food coloring with a small amount of vanilla extract or vodka to create your own paint. Dip a fine brush into the paint and carefully detail your cookie. For intricate designs, let the base icing dry first to prevent smudging. Airbrushing is another option for broader coverage. Start with light coats and build up colors gradually for even results. Edible paints are perfect for adding fine details, shading, or creating custom designs. They’re a great way to make your cookies truly unique and personalized.
Tips and Tricks
Start with simple designs and gradually move to complex patterns. Use reference images for inspiration and experiment with different brush strokes for unique effects. Allow icing to dry between layers for crisp details. Keep tools and materials organized for efficiency, and don’t hesitate to try new techniques for a personalized touch.
Working with Kids
Engaging kids in paint-your-own cookies is a delightful way to foster creativity and patience. Start by demonstrating basic techniques, such as dipping brushes in icing or using stencils. Use washable supplies and smocks to minimize mess. For younger children, pre-outline cookie designs with thin icing to guide their painting. Encourage experimentation with colors and patterns, emphasizing fun over perfection. Adult supervision is recommended, especially when handling small tools or edible paints. Break the process into manageable steps, allowing kids to take breaks and return to their masterpiece. This activity not only creates sweet treats but also lasting memories and a sense of accomplishment.
Hosting a Cookie Decorating Party
Hosting a cookie decorating party is a joyful way to bring people together and create sweet memories. Start by preparing a variety of baked cookies, royal icing, and edible paints. Set up a decorating station with tools like brushes, stencils, and sprinkles. Provide aprons or smocks to protect clothing. Demonstrate basic techniques, such as outlining and flooding, to inspire guests. Assign each person a cookie or allow them to choose their own design. Encourage creativity and collaboration, making it a fun, judgment-free zone. Serve refreshments and play music to set a lively atmosphere. This activity is perfect for birthdays, holidays, or casual gatherings, offering both entertainment and edible art to take home.
Budget-Friendly Options
Creating paint-your-own cookies doesn’t have to be expensive. Instead of buying pre-made kits, bake your own sugar cookies using a simple recipe. Use food coloring to make edible paints by mixing a few drops with vanilla extract or a small amount of water. Royal icing can be homemade with powdered sugar and egg whites, eliminating the need for store-bought icing. Decorate with sprinkles or edible glitter for a festive touch. DIY stencils can be cut from cardstock, offering a cost-effective way to add intricate designs. By making your own supplies, you can enjoy this creative activity without breaking the bank, making it accessible for families and large groups.
Storage and Serving
After decorating, allow the cookies to dry completely, ideally for 24 hours, to set the icing and paints. Store them in an airtight container at room temperature to maintain freshness. If not serving immediately, place parchment paper between each cookie to prevent sticking. For longer storage, keep the cookies in a cool, dry place away from direct sunlight. When serving, arrange the cookies on a decorative platter or individual plates for a visually appealing presentation. Consider pairing them with a side of milk or hot chocolate for a delightful treat. Ensure the cookies are served fresh to enjoy the best texture and flavor.
Troubleshooting Common Issues
Common issues when making paint-your-own cookies include icing that’s too thin or too thick. If icing is too thin, allow it to sit for a few minutes to thicken; If too thick, add a small amount of water. Drying time can also be a challenge; ensure cookies are in a cool, dry place. Smudging may occur if painted areas aren’t fully dry. To fix, gently blot with a clean brush or toothpick. For paint bleed, use high-quality food coloring or edible paints specifically designed for cookies. Properly prepared royal icing and allowing adequate drying time are key to avoiding these issues. Always test paints and icings beforehand for best results.
Final Touches and Presentation
Once your cookies are fully decorated, allow the icing and paints to set completely before handling. For a polished look, dust off excess sprinkles and smooth out any smudges with a clean brush. To enhance presentation, place cookies in decorative boxes, bags, or on a platter lined with parchment paper. Add a ribbon or gift tag for a personal touch. For events, arrange cookies on a tiered stand or tray with fresh greenery for a festive display. Clear wrapping or cellophane bags can protect the cookies while showcasing your artwork. These final touches make your paint-your-own cookies perfect for gifting, serving, or enjoying as a creative masterpiece.
Paint-your-own cookies offer endless creative possibilities, making them a delightful activity for all ages. For a unique twist, experiment with seasonal themes or custom designs, like holiday motifs or personalized messages. To add variety, incorporate edible markers or airbrush coloring for intricate details. You can also use stencils for uniform patterns or layer icing for dimensional effects. For a budget-friendly option, create your own paint palettes using food coloring and vanilla extract. These cookies are perfect for parties, gifts, or family fun, allowing everyone to take home a personalized treat. With imagination, the possibilities are limitless, making paint-your-own cookies a timeless and enjoyable creative project.